Soundproof Room/Recording/Jam Space - A Build Thread

DAWs, VST, iPads, interfaces, software, etc.

Moderator: Ghost Hip

Post Reply
User avatar
SouthIslandSplit
interested
interested
Posts: 10
Joined: Tue Feb 06, 2018 9:32 pm
Location: NZ - close(ish) to the bottom of earth

Soundproof Room/Recording/Jam Space - A Build Thread

Post by SouthIslandSplit »

I am much more of a lurker than an active participant, but I thought it was about time I change that.

With the oncoming arrival of our first child, all my music stuff has been kicked out of our house to provide enough space for the impending arrival of our new human :joy: . As a result, I have been forced (kindly consented by my understanding partner) to create a space in our garage to house all of my accumulated musical stuff. Since I am having to build it from scratch, I thought I may as well try and make it as habitable and soundproof as possible so I can tinker with electronics, blast my amp, jam with buddies and record in it etc.

The build threads on ILF are how I found this website so I thought it was time to share a little something back with community here. Also there doesn't seem to be a whole bunch of studio/soundproof room build information online which don't use specialised, expensive products such as Gib acoustic systems, Resilient Clips, Green Glue etc so I wanted document my build in case others were interested doing something similar. The major prerequisite for this was that everything had to be readily available from local hardware stores. Finally, I am hoping that documenting the build here will be a good way to motivate me to actually get on with it and complete it!

The room will be free standing (i.e. not attached to the garage walls), approximately 3 m wide x 3.5 m long x 2.3 m high and fits into the back corner of our garage. It consists of a timber frame construction which is bolted in place to the concrete floor of the garage. The outside of the framing is clad with 12 mm thick plywood cladding and two layers of 10 mm thick plasterboard (Gib, Sheetrock, Drywall etc depending on your geographical location) will line the internal walls of the framing. The wall cavities will be filled with Earth Wool insulation.

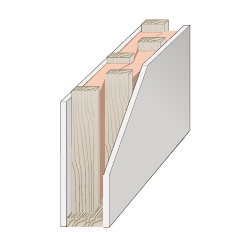
The biggest consideration that I had to take into account was decoupling the walls to reduce noise transfer. A quick Google search indicated that there seem to be a number of different methods to be able to do this but they generally all tend to use specialised products that are relatively expensive particularly given the location where I live. The most promising design that meet my requirements was using offset or staggered timber wall studs to decouple surface of the external cladding from the internal wall surfaces. A double layer of plaster board on the internal surfaces will hopefully provide enough mass and rigidity to avoid resonance issues... Will have to provide an update on this when its completed.

I stole the image below of the off set wall studs from an insulation website but it should give some idea behind the idea.

Image

The walls and roof unfortunately won't be decoupled at the corners but I am hoping some post build internal acoustic treatment may help with any issues caused by this.

I drew up my own plans which are pretty basic but the key thing was to make sure that the center of every second stud was spaced at 1200 mm so I could use a standard sheet of plasterboard or sheet of plywood to minimise cutting and waste of timber/plasterboard. If anyone is interested I can post my shitty plan drawings but they probably only make sense to me and not anyone else.....

Anyway, time for some photos.

The garage pre-build....Apologies for the ubiquitous piles of crap and junk that our garage has accumulated. I had to remove some old shelving from the area in which the room will go (back left corner) before this photo.

Image


The cleared space and mocked-up layout (green masking tape).

Image


Treatment of the concrete floor to stop moisture rising through the concrete. Two coats of Damp Stop seems to be doing the trick so far. I am also going to put a layer of plastic down before the underlay and carpet go on.

Image


Framing timber. The top and bottom plates as well as the end studs are all 90 mm by 45 mm structural timber and the bottom plates are treated to a higher standard than the other pieces of timber in case of any water/moisture ingress. The studs and dwangs (nogs, blocking, whatever you call it in your area!) are all 75 mm by 45 mm to provide the decoupling between wall surfaces.

Image


First frame built...

Image


... and in place with the second the frame. Since both of these frames are free standing next to the external walls of the garage, I had to put the plywood cladding on before moving the frames inside. They were rather weighty..

Image


The next two wall frames featuring the doorway. All the frames bolted down. Starting to look like a room now..

Image


Grainy pic of the offset studs. Hard to capture in a photo unfortunately.

Image


Roof framing in place. I realised rather quickly that getting the roof framing in place after the walls were up was going to be challenging as there wasn't much space to move between the garage roof framing and the wall framing of the room. This meant building the roof frame insitu which was a fun exercise...

Image

Inside the space. Picked up the insulation which now adds to the piles of crap that our garage holds. Managed to get 20 bales of insulation off cuts from that were going to be discarded at various building sites around town for less than $200. This should be enough to line the room and also some extra insulation for our house.

Image

Building paper on and awaiting the remaining plywood cladding..

Image

Plywood cladding is now on and the electrical wiring has begun. Photos to come.
User avatar
karmablock
experienced
experienced
Posts: 780
Joined: Mon Nov 23, 2009 1:47 am
Location: Austin, Texas

Re: Soundproof Room/Recording/Jam Space - A Build Thread

Post by karmablock »

Definitely keeping tabs on this thread. Keep up the good work!
User avatar
oldangelmidnight
IAMILFFAMOUS
IAMILFFAMOUS
Posts: 3725
Joined: Sat Aug 08, 2009 12:17 pm
Location: Northampton, MA

Re: Soundproof Room/Recording/Jam Space - A Build Thread

Post by oldangelmidnight »

This is great. Thanks for sharing.
It's funny the way people like us do our pre-baby nesting...
User avatar
coldbrightsunlight
Supporter
Supporter
Posts: 13654
Joined: Tue Oct 12, 2010 12:20 pm
Location: UK

Re: Soundproof Room/Recording/Jam Space - A Build Thread

Post by coldbrightsunlight »

This is really cool!! Interested to see the results :thumb:
füzz lover. Friend. Quilter evangelist.

I make music sometimes:

https://nitrx.bandcamp.com/

https://mediocrisy.bandcamp.com/

https://fleshcouch.bandcamp.com
User avatar
Dowi
IAMILF
IAMILF
Posts: 2658
Joined: Fri Jan 08, 2016 8:12 am
Location: Italy
Contact:

Re: Soundproof Room/Recording/Jam Space - A Build Thread

Post by Dowi »

That looks nice! I have to do the same thing for the same reason (except that the baby is already here) when we move in our new house at the beginning of next year, so I'm keeping an eye open on this thread.
BIRCH BARK | Solo stuff | Bandcamp - Youtube
HIBAGON | Polyrhythmic Heavy Duo | Bandcamp - Spotyshit
User avatar
JonnyAngle
IAMILFFAMOUS
IAMILFFAMOUS
Posts: 4233
Joined: Wed Feb 25, 2015 11:35 am
Contact:

Re: Soundproof Room/Recording/Jam Space - A Build Thread

Post by JonnyAngle »

this is hot! Can we get an update?
User avatar
SouthIslandSplit
interested
interested
Posts: 10
Joined: Tue Feb 06, 2018 9:32 pm
Location: NZ - close(ish) to the bottom of earth

Re: Soundproof Room/Recording/Jam Space - A Build Thread

Post by SouthIslandSplit »

Alright so it has been a minute or two since I posted here but the room is now 99% complete.

It took a a couple of extra months longer than I anticipated (funny that it always seems to be the case with most things...) as well as my son being born earlier than expected. Loads of ups and downs on the old life roller coaster but good times nonetheless.

I will try and do a proper update in the next week with pictures etc.. Definitely appreciate the interest from the Fuzz crew!
User avatar
SouthIslandSplit
interested
interested
Posts: 10
Joined: Tue Feb 06, 2018 9:32 pm
Location: NZ - close(ish) to the bottom of earth

Re: Soundproof Room/Recording/Jam Space - A Build Thread

Post by SouthIslandSplit »

So things got delayed a bit with arrival of our little guy but we managed to get back into completing the room.

The next step after the finishing the framing was to install the external cladding on the roof and the remaining two outside walls. As with the other two outside walls, we used 12 mm thick plywood and wood screws. Crawling around on the roof of the room on 12 mm thick ply did make me wonder whether I should have went with 18 mm ply as it felt like it sagged a little with my weight but it will mostly used to store boxes of stuff rather than crawling around on it so it should be fine. Plus the 12 mm ply was pretty cheap which was a bonus.

Plywood cladding on.
Image


Sealing all the gaps and holes between the inside to the outside with sealant.
Image


Next up the electrical wiring installed with the help of my electrician mate.
Image


And then insulation and the first layer of plaster board on the lower parts of the walls.
Image


If you end up building something similar, I can't recommend using one these enough - a plasterboard lifter. Makes installing the ceiling plasterboard significantly easier. Second layer of the plasterboard going up in this photo. All the joins in the first layer of plasterboard were filled in with acoustic/fire sealant before installing the second layer.
Image


Both layers of plasterboard installed. All the joins were filled in with acoustic/fire sealant before being plastered over.
Image

Image


We were trying to make the room as airtight as possible to contain and also keep noise out, however we still wanted to be able to breathe so we had to install a ventilation system to maintain some airflow in the room. This took a bit of thinking as most ventilation systems are pretty pricey and complex. We ended up deciding on a negative pressure system using a grunty bathroom style extractor fan and a baffle system to reduce noise getting out and also noise coming into the room. The baffle consists of two separate baffled chambers - one to allow air to flow passively into the room and the other baffle with the extractor fan located at the outlet to pull air out of the room to the outside.

Installing the inlet and outlet holes for the ventilation system inside the room.
Image

Building and lining the noise baffle system. Not entirely happy with it and plan to go back and replace the lining with better acoustic foam rather than the rough lining I have used here.
Image

For the door, I picked up a cheap cardboard honeycomb filled door, added some additional bracing and filled it with installation (we actually did this near the start of the build but I forgot to post it previously). We then covered the insulation with 12 mm thick MDF, a layer of 10 mm plaster board and finally some 9 mm plywood that was lying around. Additional thickness and mass are apparently friends when it comes to blocking out noise anyway.

Door filled with insulation. Sheet of MDF to go on behind.
Image

After that it was just a matter of a little bit of plastering, sanding and painting before laying the carpet. Even though we had sealed the concrete with a moisture barrier, we laid down a layer of plastic before the underlay and carpet to provide an extra barrier against any moisture. Carpet and underlay was sourced free from my brother in law and also from the free bin at a carpet shop respectively. Then it was move in time!

Image

Image

Still a few minor, non-urgent things to go such as finishing off the seal around the door frame, some shelving, relining the ventilation baffle and adding some acoustic treatment. Will try and give some more updates when we get around to making these improvements, although it may be while before we get around to them..

Its not a massive space but it is definitely large enough for my needs to jam with a drummer, do some recording and fiddle around making pedals. Pretty stoked its done! In fact, we managed to record a tune in there this past week - just a cover of a classic Uncle Neil tune that we sing to get our little guy to sleep.

http://soundcloud.com/user-468214189/cortez-the-killer

In terms of sound proofness, I haven't done any real testing, but I was playing my amp cranked a bit over half way and my partner didn't know I was playing it even when she was at the door so it must be doing something!

In terms of cost to build the room, it cost us around NZ$3,500 all up. Not super cheap, but a worthwhile adventure. All in all a fun project! If anyone has any specific questions etc, let me know.
User avatar
coldbrightsunlight
Supporter
Supporter
Posts: 13654
Joined: Tue Oct 12, 2010 12:20 pm
Location: UK

Re: Soundproof Room/Recording/Jam Space - A Build Thread

Post by coldbrightsunlight »

Oh wow it looks great! Well done :) :)
füzz lover. Friend. Quilter evangelist.

I make music sometimes:

https://nitrx.bandcamp.com/

https://mediocrisy.bandcamp.com/

https://fleshcouch.bandcamp.com
User avatar
SouthIslandSplit
interested
interested
Posts: 10
Joined: Tue Feb 06, 2018 9:32 pm
Location: NZ - close(ish) to the bottom of earth

Re: Soundproof Room/Recording/Jam Space - A Build Thread

Post by SouthIslandSplit »

coldbrightsunlight wrote:Oh wow it looks great! Well done :) :)
Thanks! Very happy it’s finally finished and I can spread my music gear everywhere.
User avatar
coldbrightsunlight
Supporter
Supporter
Posts: 13654
Joined: Tue Oct 12, 2010 12:20 pm
Location: UK

Re: Soundproof Room/Recording/Jam Space - A Build Thread

Post by coldbrightsunlight »

Yeass the best feeling!! Enjoy :thumb:
füzz lover. Friend. Quilter evangelist.

I make music sometimes:

https://nitrx.bandcamp.com/

https://mediocrisy.bandcamp.com/

https://fleshcouch.bandcamp.com
User avatar
Dowi
IAMILF
IAMILF
Posts: 2658
Joined: Fri Jan 08, 2016 8:12 am
Location: Italy
Contact:

Re: Soundproof Room/Recording/Jam Space - A Build Thread

Post by Dowi »

Really awesome work man, that noise baffle is a great solution for the ventilation problem, saved in my bookmarks as i'll probably have to do a similar thing next year.
BIRCH BARK | Solo stuff | Bandcamp - Youtube
HIBAGON | Polyrhythmic Heavy Duo | Bandcamp - Spotyshit
User avatar
SouthIslandSplit
interested
interested
Posts: 10
Joined: Tue Feb 06, 2018 9:32 pm
Location: NZ - close(ish) to the bottom of earth

Re: Soundproof Room/Recording/Jam Space - A Build Thread

Post by SouthIslandSplit »

Dowi wrote:Really awesome work man, that noise baffle is a great solution for the ventilation problem, saved in my bookmarks as i'll probably have to do a similar thing next year.
Cheers! Definitely going to give the baffle an upgrade as when the fan is on it introduces a bit of noise into the room. Doesn’t seem to be letting too much noise out though. Good luck for your own build. Definitely share some photos when you get to it.
Post Reply