Page 1 of 3
So I'm building this bass...
Posted: Wed Dec 07, 2011 6:32 pm
by STYX
... and I thought I'd share my progress so far with you guys. The body is 2 piece alder, one piece maple neck and rosewood fretboard. The plan is for it to have a hot p-bass pickup and a Les Paul Custom inspired finish, i.e. entirely black with cream binding and gold hardware. That's going to be some time yet, so here's how it looks at the moment:
Body shape outline in high-contrast-o-vision, so you can actually see it in the picture. Still not entirely happy about the balance, might make the "waist" a little slimmer, even though I wanted it to look fairly strong and chunky.
Headstock with routed binding channel and barely visible slotted fretboard.
Reverse to show the headstock/neck join. It feels smooooth!
Re: So I'm building this bass...
Posted: Thu Dec 08, 2011 9:55 am
by MaxMaps
Hnnnnnggg
Re: So I'm building this bass...
Posted: Thu Dec 08, 2011 11:52 am
by eatyourguitar
Re: So I'm building this bass...
Posted: Thu Dec 08, 2011 2:40 pm
by Jero
That's something I do miss about elbandito. Always posting new guitar builds. Can't wait to see how it turns out, I've always wanted to build a bass from the ground up.
Re: So I'm building this bass...
Posted: Fri Dec 09, 2011 12:59 am
by John Lyons
Go man go!
Re: So I'm building this bass...
Posted: Mon Dec 12, 2011 5:46 pm
by STYX
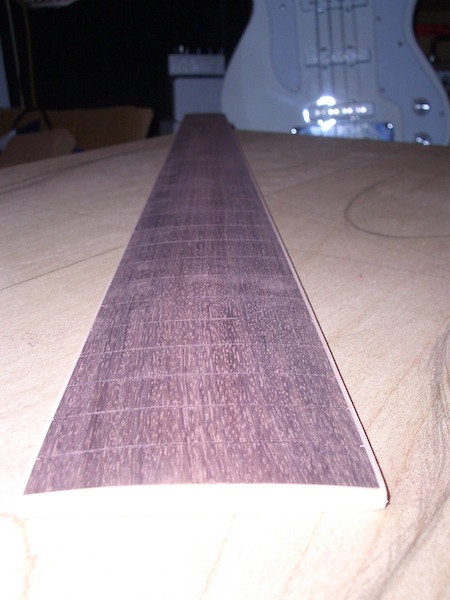
Weekend is bass building time! One day of gluing and another of sanding yielded the following result:
A bound and radius sanded fretboard!
Now I can start installing the frets, which will enable me to calculate the neck angle...
Incidentally, I forgot to order more binding and used pretty much everything on the fretboard, so the headstock will have to wait a little.
Inevitable beauty shot (note: move further away when using flash)
- CIMG3554.JPG (69.89 KiB) Viewed 8207 times
Thank you guys for replying and the encouragement. If any of you are following the thread: more updates from next week through New Year's Day - I've set myself the goal of having all the wood (body, neck, fretboard) in place by the new year. After that it's going to be a weekend project again.
Re: So I'm building this bass...
Posted: Mon Dec 19, 2011 8:55 pm
by STYX
Fretboard is completely done now, which involved making 22 of these:
Frets cut to length with the ends of the tang (I think that's what it's called) removed to keep the binding intact. Frets must be made out of the hardest material know to man - cutting them with pliers was a pain. Luckily I got the fretwire pre-bent to the radius, which undoubtedly saved me quite a lot of time. Still, it took an estimated 10-20 minutes to install each fret, plus another couple of hours to finish the ends as can be seen on some of the frets here:
I've also revised the body shape slightly. This is likely to be final:
And I've started on the neck tenon. I *do not* trust the jig saw to make accurate straight cuts, so I left a pretty wide safety margin which needs to be filed down. The neck will have a very slight angle to it.
Re: So I'm building this bass...
Posted: Tue Dec 20, 2011 12:16 am
by Boxbie
Tidy neck work!
keep em coming!
Re: So I'm building this bass...
Posted: Tue Dec 20, 2011 2:32 am
by eatyourguitar
are your frets nickel or steel. the nickel is easier to work with. do you press them in an arbor or do you hammer them it? 1000 years ago they just hammered them in and they would take the radius of the neck from all the hammering. do you put a dot of glue on each end of the fret? and yes the bottom is called a tang. there is a tool called a tang cutter.
Re: So I'm building this bass...
Posted: Tue Dec 20, 2011 1:14 pm
by counterdestroy
i like the jealous jet king lurking in the background
Re: So I'm building this bass...
Posted: Tue Dec 20, 2011 2:56 pm
by STYX
eatyourguitar wrote:are your frets nickel or steel. the nickel is easier to work with. do you press them in an arbor or do you hammer them it? 1000 years ago they just hammered them in and they would take the radius of the neck from all the hammering. do you put a dot of glue on each end of the fret? and yes the bottom is called a tang. there is a tool called a tang cutter.
The frets are stainless steel. I did apply glue to the areas where the tang had been removed before hammering the frets in place using a bit of wood to protect them.
As for tools, I've seen the nice stuff on Stewmac and such, but I don't want to spend money on specialist equipment unless I start building instruments on a regular basis. So far the only luthier's tools I've bought are a fret saw for its narrow kerf and the radiused sanding block.
Re: So I'm building this bass...
Posted: Fri Dec 23, 2011 11:22 am
by STYX
So here's why I don't trust the jigsaw too much (note the angle on the right of the tenon)
It may have been just me trying to cut through the wood too quickly and putting pressure on the blade. Anyhow, this will get a bit of waste maple glued to it and then be re-cut. But the surface of the waste wood isn't flat either, nor are all the other angles right on the tenon yet.
ARGH! More cutting, filing, sanding and precise-as-possible measuring, considering there don't seem to be any straight lines or right angles anywhere!
On the plus side, while the glue's drying I can still start cutting the body, which will seem like a huge progress.
Re: So I'm building this bass...
Posted: Tue Dec 27, 2011 11:56 am
by STYX
Fixing the tenon:
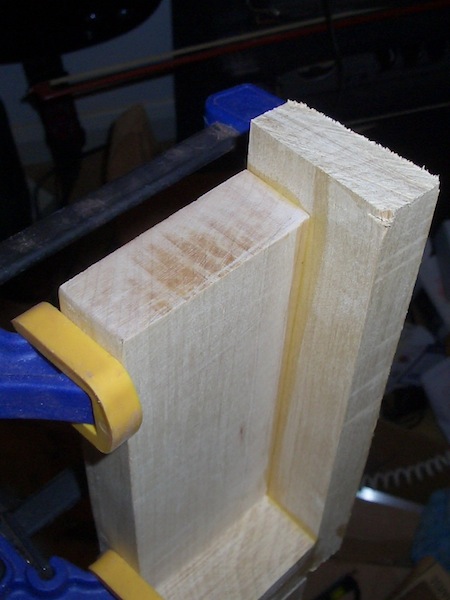
- CIMG3581.JPG (65.35 KiB) Viewed 8091 times
Waste wood clamped and left to dry for a day.
The result after sawing and a little bit of sanding:
FIXED! I think this has worked out rather nicely.
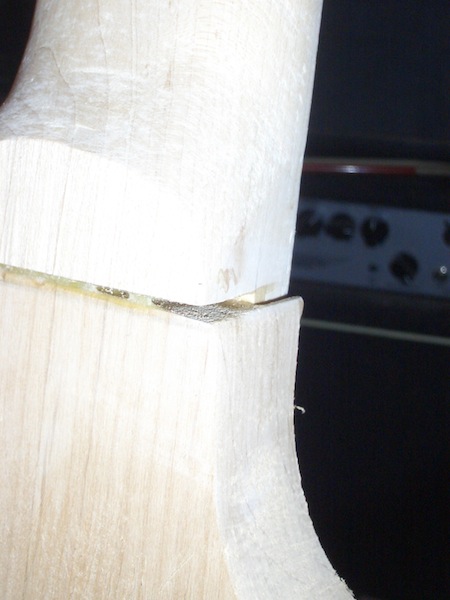
I cut most of the body outline and the neck/body join out of the block of alder while fixing the tenon.
After having measured out the tenon and cutting, filing and sanding it, there was a 2mm gap on one side when placing the neck straight on the body. So I took the 2mm off the side of the tenon and it still wouldn't sit flush with the body

It took me a while to realise I should maybe check to see if the join was level on the body side, which of course it wasn't.

So instead of taking more material off the tenon, I got the body side to match. The whole join now runs at a slight angle, but the neck should be straight.
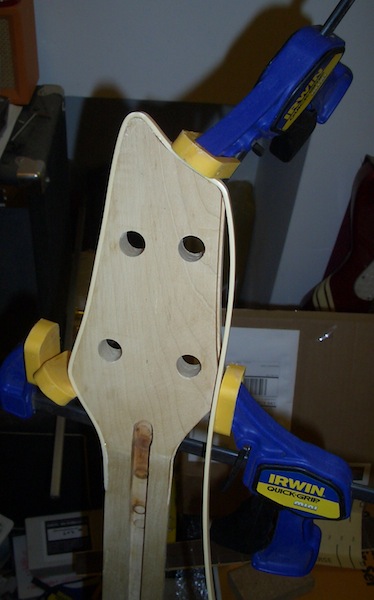
I've got the neck clamped to the body here to mark out the neck pocket. The insides of the cutaways haven't been removed yet to give the router some more material to rest on. To get the neck straight, I attached some thread at both ends and lined it up with the centerline as best I could.
Re: So I'm building this bass...
Posted: Sat Jan 07, 2012 12:08 pm
by STYX
Update time!
The body has got the neck pocket routed and the cutaways done. I've only just started on the heel of the neck, but it's taking shape. Getting the sides of the body (more or less) straight and removing saw and file marks took a LOT of sanding. I fear there's even more of that to come.
Received in the post this week:
Box of goodness no.1
Clear nitrous gloss, polish, masking tape and BINDING! The roll top right contains 2000 grit sandpaper for finishing.
Box of goodness no.2
Fairly self explanatory. The second cap is a .047. I've seen wiring diagrams with .022 and .047, so I'll try both and use he one that sounds better.
Re: So I'm building this bass...
Posted: Sat Jan 21, 2012 7:01 pm
by STYX
Greetings to all of you still following this thread!
I finally had enough of filing and sanding and decided to route the binding channel and glue the neck in place. Using the setup I have for contour routing proved problematic on the inside of the horns. After one of the many adjustments I forgot to fasten some screws and the bit made its way into the body deeper than intended... Also the neck doesn't fit as tightly as I thought at first.
Not as tightly by far!
- CIMG3594.JPG (59.56 KiB) Viewed 7974 times
That's going to get a whole lot of filler (sawdust+glue) in it then.
Decided to do the headstock binding today, which called for some very creative clamping
- CIMG3595.JPG (56.56 KiB) Viewed 7974 times
As it turns out the plastic manages to resist superglue and being clamped like this for half an hour. I'll have to try and shape it a little before trying again. The binding on the headstock will be sanded down to match the thickness of the fretboard binding once it's in place.
