Page 1 of 3
Devistortion clone build
Posted: Sun Jul 03, 2011 4:41 pm
by jfrey
Devistortion clone build in progress for Astricii.
Graphics done. Thought you guys might like to see.

Re: Devistortion clone build
Posted: Sun Jul 03, 2011 4:48 pm
by McSpunckle
Woah! Cool graphics!
Re: Devistortion clone build
Posted: Sun Jul 03, 2011 4:50 pm
by Heavy_Soul
Graphics are awesome! What 2 pedals make up the Devistortion?
Re: Devistortion clone build
Posted: Sun Jul 03, 2011 4:51 pm
by jfrey
McSpunckle wrote:Woah! Cool graphics!

Heavy_Soul wrote:Graphics are awesome! What 2 pedals make up the Devistortion?
EB and KP

Re: Devistortion clone build
Posted: Sun Jul 03, 2011 5:02 pm
by chutneyfarmer
Gorgeous looking pedal. What does the switch do???
Re: Devistortion clone build
Posted: Sun Jul 03, 2011 5:08 pm
by the Life Aquatic
That graphic is amazing!
Re: Devistortion clone build
Posted: Sun Jul 03, 2011 11:02 pm
by eatyourguitar
how exactly did you do that graphic. I see a sharpie. tweet the deets
Re: Devistortion clone build
Posted: Mon Jul 04, 2011 1:19 am
by jfrey
chutneyfarmer wrote:Gorgeous looking pedal. What does the switch do???
Thanks. I actually haven't decided yet. There are a few things I'm debating between. It was more my ocd need to have the drilling be symmetrical than a necessity.
the Life Aquatic wrote:That graphic is amazing!
eatyourguitar wrote:how exactly did you do that graphic. I see a sharpie. tweet the deets
I brought an image I found into Adobe Illustrator and cleaned up the lines. Then printed it out and using double sided tape affixed the print to some card stock. Then I used an exacto to cut out all the black except for the finest lines (in the hair on top, the hair tie, and nose). I first put down a few layers of white on the face of the pedal. Then I painted over it in black with the stencil I created. After that I drew in by hand the lines of the hair, hair tie, and nose. Then I put down a few layers of clear coat.
Re: Devistortion clone build
Posted: Mon Jul 04, 2011 1:21 am
by the Life Aquatic
thats not sharpied on is it? some of the lines look to thin and precise to be sharpie, the lips make it look to me like it was airbrushed on, how did u do the graphics?
Re: Devistortion clone build
Posted: Mon Jul 04, 2011 1:24 am
by jfrey
the Life Aquatic wrote:thats not sharpied on is it? some of the lines look to thin and precise to be sharpie, the lips make it look to me like it was airbrushed on, how did u do the graphics?
See above.
")
What's really upsetting me is an imperfection at the edge of the very top of the face. It started to rain while I was painting outside and caused some rippling before I could get it inside. It isn't very noticeable, but I may have to sand it out and try to fix it.

I had to sand out the first layer of white I put down when mere seconds after beginning to paint not 1 but 2 flies landed in the paint.
Re: Devistortion clone build
Posted: Tue Jul 05, 2011 2:47 pm
by Dandolin
Tank Grrrrrl FTW!
Re: Devistortion clone build
Posted: Tue Jul 05, 2011 10:52 pm
by jfrey
Just finished the KP circuit. The circuit itself is 5/8" X 1/4" I left a little extra room around it with the board just because there isn't really a reason it needs to be smaller.
- KP.jpg (89.46 KiB) Viewed 2849 times
(Left to right: R1, C1, R2, R3, Q1, C2)
R1: 2M2
R2: 3M3
R3: 10K
C1: 104
C2: 104
Q1: MPSA18
Re: Devistortion clone build
Posted: Tue Jul 05, 2011 11:24 pm
by culturejam
Looks like an Electra with low-pass filter on the input?
Re: Devistortion clone build
Posted: Tue Jul 05, 2011 11:27 pm
by jfrey
culturejam wrote:Looks like an Electra with low-pass filter on the input?
bubstance told me this in another thread:
bubstance wrote:if you remove the 2.2M in parallel with the input cap, add a 680R resistor to ground off the emitter of the MPSA18 and add some clipping diodes to ground after the second cap you've got an Electra distortion (which I'm sure was the starting point). Better yet, swap the 3.3M resistor for a diode and you've basically got a Bazz Fuss.
Re: Devistortion clone build
Posted: Wed Jul 06, 2011 1:41 am
by jfrey
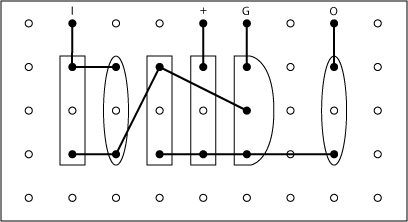
And the EB circuit. Made to fit nicely like the other one. 7/8" X 1/4" plus a little room around the board.
- EB.jpg
- (97.48 KiB) Downloaded 377 times
(Left to right: C1, C2, R1, R2, Q1, Q2, C3, C4)
C1: 103
C2: 104
C3: 104
C4: 104
R1: 3M3
R2: 10K
Q1: MPSA18
Q2: MPSA18
NOTE: For some reason I drew this one as a bottom up view and the other as a top down view. I'll redraw this one when I get a chance so they're from the same perspective. It isn't very important so long as you know that in each picture the transistors are oriented E, B, C (from top of image down).