Page 362 of 409
Re: Let's see your finished DIY projects!
Posted: Fri May 04, 2018 2:59 pm
by LaoWiz
Thanks ya'll!
AZX309 wrote:im always impressed the minute details you get on those etches.
Thanks, homie. It's the good ole HP glossy presentation paper and radio shack branded ferric chloride that gets me there!
Re: Let's see your finished DIY projects!
Posted: Fri May 04, 2018 4:45 pm
by Jero
LaoWiz wrote:Thanks ya'll!
AZX309 wrote:im always impressed the minute details you get on those etches.
Thanks, homie. It's the good ole HP glossy presentation paper and radio shack branded ferric chloride that gets me there!
So you do your laser printing straight to that stuff, and then transfer from there as usual? Cheaper than that pnp blue or whatever?
Also, I notice some of you guys sometimes get really deep etches, with very nice hard edges. How are you doing this? Multiple light dips or?
*goes to relearn about etching*
Re: Let's see your finished DIY projects!
Posted: Fri May 04, 2018 5:20 pm
by LaoWiz
Jero wrote:
So you do your laser printing straight to that stuff, and then transfer from there as usual? Cheaper than that pnp blue or whatever?
Also, I notice some of you guys sometimes get really deep etches, with very nice hard edges. How are you doing this? Multiple light dips or?
*goes to relearn about etching*
Yep just printing the design on the paper and then ironing on same as PCBs. That paper came in a pack of 200 for maybe 20 bucks so much cheaper the pnp blue. I never liked pnp blue as it always scratched off easy from the enclosure.
For me, I etch face up. When the reaction between the acid and the enclosure starts to heat up I let burn for a bit and then place in a tub of water nearby and let it cool off quickly. maybe 30 secs and then repeat this several times. Depends on the brand of enclosure too, at least for me. Some work better than others. But pretty much, once the acid starts digging in a bit you'll see chunks of the top layer being etched as away and you know you're getting some depth. Push it too far and with the reaction / heat you start eating into the toner so just need to find the balance which just comes with practice. Dminner gets deep and I think he etches face up too. not sure what kind of acid he burning with though....
Re: Let's see your finished DIY projects!
Posted: Sat May 05, 2018 8:37 am
by dminner
LaoWiz wrote:Jero wrote:
So you do your laser printing straight to that stuff, and then transfer from there as usual? Cheaper than that pnp blue or whatever?
Also, I notice some of you guys sometimes get really deep etches, with very nice hard edges. How are you doing this? Multiple light dips or?
*goes to relearn about etching*
Yep just printing the design on the paper and then ironing on same as PCBs. That paper came in a pack of 200 for maybe 20 bucks so much cheaper the pnp blue. I never liked pnp blue as it always scratched off easy from the enclosure.
For me, I etch face up. When the reaction between the acid and the enclosure starts to heat up I let burn for a bit and then place in a tub of water nearby and let it cool off quickly. maybe 30 secs and then repeat this several times. Depends on the brand of enclosure too, at least for me. Some work better than others. But pretty much, once the acid starts digging in a bit you'll see chunks of the top layer being etched as away and you know you're getting some depth. Push it too far and with the reaction / heat you start eating into the toner so just need to find the balance which just comes with practice. Dminner gets deep and I think he etches face up too. not sure what kind of acid he burning with though....
I do etch face up too. I don't use acid, I use a base. I get sodium hydroxide pellets off of Amazon (for soap making). Mix up a solution that is 40g in 100ml of water. It is slower and more controlled than acid. So I add it, go do something for 30-40min, come back and rinse it off. It doesn't give off fumes like the acid and to dispose Just rinse it down the drain, most drain cleaners are just sodium hydroxide solution.
Re: Let's see your finished DIY projects!
Posted: Sat May 05, 2018 8:55 am
by fuzzonaut
LaoWiz wrote:Finished these fun ones, better pics on my tumblr
Tone Machine:

Corruptor Ring Modulator (Parasit Studio)


Amazing stuff!

As always.
Now I don't really feel like posting another boring one knob fuzz with a lame ass photo transfer look I recently made ....

Re: Let's see your finished DIY projects!
Posted: Sat May 05, 2018 10:03 am
by BetterOffShred
I hide my bullshit builds elsewhere..
")
Thanks for sharing your techniques on etching fellas. It's just a matter of time before I give it a try. I follow dminner on IG and Ilove seeing what you guys come up with hehe
Re: Let's see your finished DIY projects!
Posted: Sat May 05, 2018 11:10 am
by dminner
BetterOffShred wrote:I hide my bullshit builds elsewhere..
Thanks for sharing your techniques on etching fellas.
I have to do some etching this weekend. I will make a tutorial with pictures
")
Re: Let's see your finished DIY projects!
Posted: Sat May 05, 2018 1:41 pm
by cherler
dminner wrote:LaoWiz wrote:Jero wrote:
So you do your laser printing straight to that stuff, and then transfer from there as usual? Cheaper than that pnp blue or whatever?
Also, I notice some of you guys sometimes get really deep etches, with very nice hard edges. How are you doing this? Multiple light dips or?
*goes to relearn about etching*
Yep just printing the design on the paper and then ironing on same as PCBs. That paper came in a pack of 200 for maybe 20 bucks so much cheaper the pnp blue. I never liked pnp blue as it always scratched off easy from the enclosure.
For me, I etch face up. When the reaction between the acid and the enclosure starts to heat up I let burn for a bit and then place in a tub of water nearby and let it cool off quickly. maybe 30 secs and then repeat this several times. Depends on the brand of enclosure too, at least for me. Some work better than others. But pretty much, once the acid starts digging in a bit you'll see chunks of the top layer being etched as away and you know you're getting some depth. Push it too far and with the reaction / heat you start eating into the toner so just need to find the balance which just comes with practice. Dminner gets deep and I think he etches face up too. not sure what kind of acid he burning with though....
I do etch face up too. I don't use acid, I use a base. I get sodium hydroxide pellets off of Amazon (for soap making). Mix up a solution that is 40g in 100ml of water. It is slower and more controlled than acid. So I add it, go do something for 30-40min, come back and rinse it off. It doesn't give off fumes like the acid and to dispose Just rinse it down the drain, most drain cleaners are just sodium hydroxide solution.
What kind of surface does this leave over the etched parts? I kinda like the gross pitted dark grey you can get with hydrochloric. Also if it doesn't give off fumes can you etch indoors? This was my first not Florida winter (now in NH) and etching outside totally sucked...
Re: Let's see your finished DIY projects!
Posted: Sat May 05, 2018 3:21 pm
by LaoWiz
dminner wrote:
I do etch face up too. I don't use acid, I use a base. I get sodium hydroxide pellets off of Amazon (for soap making). Mix up a solution that is 40g in 100ml of water. It is slower and more controlled than acid. So I add it, go do something for 30-40min, come back and rinse it off. It doesn't give off fumes like the acid and to dispose Just rinse it down the drain, most drain cleaners are just sodium hydroxide solution.
I was looking into sodium hydroxide a couple of weeks ago. Sounds nice as it doesn't give off fumes. Will prob give it a try sometime down the road...
Re: Let's see your finished DIY projects!
Posted: Fri May 11, 2018 11:26 am
by Jero
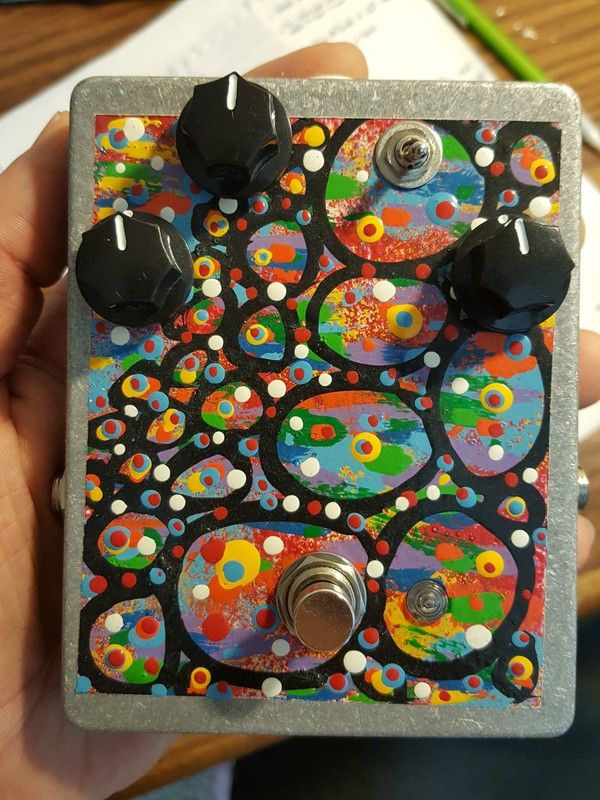
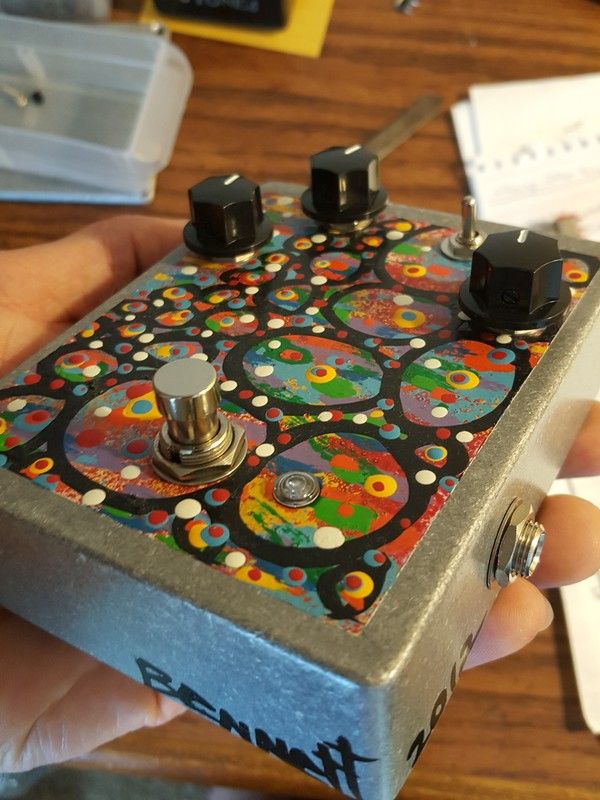
Throwback Laura Bennett box goodness
Re: Let's see your finished DIY projects!
Posted: Fri May 11, 2018 12:01 pm
by emcee_m_prime
First attempt at a pedal build. A little embarrassed to show it after all the crazy stuff in this thread. It's basically a modified Acapulco Gold with a gain knob. I didn't get the graphics exactly right but it sounds great so whatever.


Re: Let's see your finished DIY projects!
Posted: Fri May 11, 2018 12:26 pm
by Jero
emcee_m_prime wrote:First attempt at a pedal build. A little embarrassed to show it after all the crazy stuff in this thread. It's basically a modified Acapulco Gold with a gain knob. I didn't get the graphics exactly right but it sounds great so whatever.
Looks awesome

Re: Let's see your finished DIY projects!
Posted: Mon May 14, 2018 10:52 am
by Jwar
LaoWiz wrote:dminner wrote:
I do etch face up too. I don't use acid, I use a base. I get sodium hydroxide pellets off of Amazon (for soap making). Mix up a solution that is 40g in 100ml of water. It is slower and more controlled than acid. So I add it, go do something for 30-40min, come back and rinse it off. It doesn't give off fumes like the acid and to dispose Just rinse it down the drain, most drain cleaners are just sodium hydroxide solution.
I was looking into sodium hydroxide a couple of weeks ago. Sounds nice as it doesn't give off fumes. Will prob give it a try sometime down the road...
This is absolutely brilliant and I love the idea of no fumes at all! I've always wanted to ask you folks about the etching but I don't want to intrude on brand secrets. I'm pretty transparent about my shit but some aren't. Plus, I'm not really doing it much these days. Though, I'd love, love, love to try this method and what I can come up with.
It's kind of unfair because I can place transfers easier than most. All I do is paint and then laser cut through it and that's my transfer. LOL. Pretty easy now. Still can be hard to get those good lines however.
Re: Let's see your finished DIY projects!
Posted: Mon May 14, 2018 11:18 am
by Jero
dminner wrote:LaoWiz wrote:Jero wrote:
So you do your laser printing straight to that stuff, and then transfer from there as usual? Cheaper than that pnp blue or whatever?
Also, I notice some of you guys sometimes get really deep etches, with very nice hard edges. How are you doing this? Multiple light dips or?
*goes to relearn about etching*
Yep just printing the design on the paper and then ironing on same as PCBs. That paper came in a pack of 200 for maybe 20 bucks so much cheaper the pnp blue. I never liked pnp blue as it always scratched off easy from the enclosure.
For me, I etch face up. When the reaction between the acid and the enclosure starts to heat up I let burn for a bit and then place in a tub of water nearby and let it cool off quickly. maybe 30 secs and then repeat this several times. Depends on the brand of enclosure too, at least for me. Some work better than others. But pretty much, once the acid starts digging in a bit you'll see chunks of the top layer being etched as away and you know you're getting some depth. Push it too far and with the reaction / heat you start eating into the toner so just need to find the balance which just comes with practice. Dminner gets deep and I think he etches face up too. not sure what kind of acid he burning with though....
I do etch face up too. I don't use acid, I use a base. I get sodium hydroxide pellets off of Amazon (for soap making). Mix up a solution that is 40g in 100ml of water. It is slower and more controlled than acid. So I add it, go do something for 30-40min, come back and rinse it off. It doesn't give off fumes like the acid and to dispose Just rinse it down the drain, most drain cleaners are just sodium hydroxide solution.
Thanks for the tips you guys. I'll have to give that a go some time! Someone gave me a small old laser printer recently and it works, but I think I need to replace the toner.
Re: Let's see your finished DIY projects!
Posted: Fri May 18, 2018 5:51 pm
by SoaringTortoise
Springs for Spring
[youtube]http://www.youtube.com/watch?v=HwqB5dezszA[/youtube]