Page 247 of 409
Re: Let's see your finished DIY projects!
Posted: Sun Jul 14, 2013 8:40 pm
by mysteriousj
spruce_moose wrote:Not technically finished but is as far as the circuit is concerned. It's a new fuzz design with controls being pre-gain, mega death ray, post gain and clean blend. Can get styles of fuzz between a muff and a scrambler (all the way down to low gain) and can also achieve a controllable feedback loop in the highest gain settings. It has trimpots on the pcb to adjust eq. My first shot using smd on a DIY board. Normally I just use through-hole components. Very surprised when it fired up with no issues! Have had a friend do the artwork. Gonna be rad

NICE!! Can you etch my delay boards now please? :P That's such a clean etch. The one time I tried to etch it ended up a horrible mess

Mike wrote:Another completed build. I wonder what this one does...

That's milled out all the way through? That's so awesome. Glitter and sparkles make everything better.

Re: Let's see your finished DIY projects!
Posted: Sun Jul 14, 2013 9:49 pm
by Mike
Thanks guys.

Yes, it is cut all the way through. Drill, file, time.
This was really a proof of concept kind of thing, to see if it would work. The color of the glitter makes the epoxy appear tinted, and it looks really deep. I like the way it came out, and plan on doing something much more complex.
There are still some problems I am working out.
The epoxy set too fast for the word fuzz on this one. It needed a double layer of glitter and epoxy, which is why it doesn't glow. Lesson learned-- don't mix epoxy in a container that has partially cured epoxy in it.

Air bubbles under the glitter don't have time to escape with the epoxy I have been using. I started with 5-minute epoxy, and moved up to 30-minute epoxy. I'm ordering some Envirotex, and that should solve the air bubble problem.
Getting a nice, even layer of glitter isn't easy. It has to be stuck down so it doesn't get wicked up when you put on the epoxy. I am using Elmer's clear school glue thinned with water, applied to blue tape. The sides have to be free of glitter or glue, or else the epoxy won't have anything to grip. Any glue that is on top of the glitter reduces the sparkle. Super glue eats the glitter, and makes everything hazy.
Mike
Re: Let's see your finished DIY projects!
Posted: Mon Jul 15, 2013 3:33 am
by Mass_Hysterika
Here's my Feedback Looper / Killswitch. I must admit it's inspired from "McSpunckle" one on page 2 of this topic.

Right footswitch (true bypass) puts fx loop ON : signal from in to send and return to output
Toggle switch :continuous feedback mode (left position) or single loop only (right pos)
LED bicolor : Red in feedback mode, Green in single loop mode
Pot : feedback level.
Left footswitch is momentary :
- If fx loop is ON : activates momentary feedback (toggle switch = right position) or stop it momentary (left position)
- If fx loop is OFF : « kills » signal, no output
Schematic :
http://hpics.li/5da02a3
Additional pics :
http://hpics.li/0446a55
http://hpics.li/545f1fb
http://hpics.li/80484c8
http://hpics.li/870461e
Re: Let's see your finished DIY projects!
Posted: Mon Jul 15, 2013 4:50 am
by spruce_moose
LaoWiz wrote:What ever happened with the insane ring mod thing you posted awhile back?
It's so close

I've lost heart with it at the moment because I can't work my way around a medium sized pop when bypassed. Maybe I need to add an emitter follower to the output.. something to do with the output impedance being a tad high maybe? There's also a relay, but it appeared to be fine after using a flyback diode

..I wish I was more savvy with the theory side of things. It also had a bit of weirdness in an opamp, but that was before I realised they weren't great at dealing with capacitive loads. She's slow moving, alright.
mysteriousj wrote:
NICE!! Can you etch my delay boards now please? :P That's such a clean etch. The one time I tried to etch it ended up a horrible mess
Giz a go?! I reckon if you reduced your second side to jumpers, It'd speed up your prototyping a bit.. Not sure if you need that earth plane for the digi/analog stuff though
Mike wrote:Another completed build. I wonder what this one does...
Woah! I made something similar a while back..

Just got a bit happy with the drill press, then tried getting designs laser cut. Very rad, but I hated the epoxy part.. How did you pour it? I used to seal it inside the case and pour from outside, then sand off the excess. After realising that was probably a daft way of doing it I contemplated using a decent tape to seal the outside then pour from the inside.. less excess. haven't gotten back to trying it though.
Re: Let's see your finished DIY projects!
Posted: Mon Jul 15, 2013 4:54 am
by spruce_moose
Sorry I missed the post above on your method. I found gullwing LEDs are much better for spreading the light at short distance something like a 120degree spread vs something like 30 in standard ones. They're on ebay cheaap as
Re: Let's see your finished DIY projects!
Posted: Tue Jul 16, 2013 1:28 am
by eatyourguitar
Re: Let's see your finished DIY projects!
Posted: Tue Jul 16, 2013 1:59 am
by The4455
What is?
Re: Let's see your finished DIY projects!
Posted: Tue Jul 16, 2013 6:17 pm
by eatyourguitar
so I can hook up my 1/4in synth gear to my banana jack synth gear.

Re: Let's see your finished DIY projects!
Posted: Thu Jul 18, 2013 4:48 am
by Hexjibber
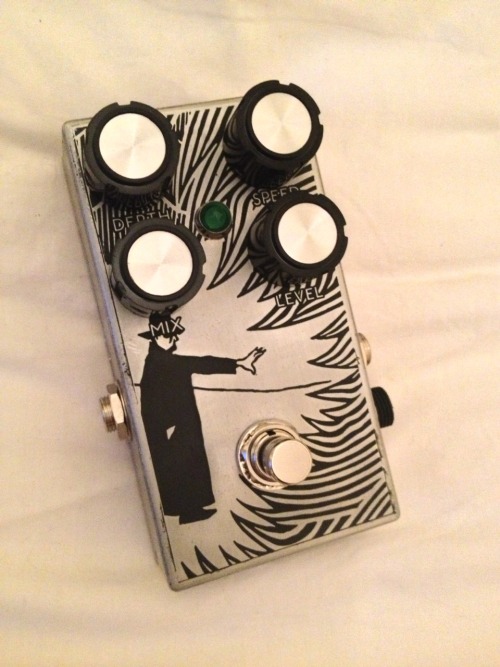
Madbean Double Flush Tremelo
Re: Let's see your finished DIY projects!
Posted: Fri Jul 26, 2013 8:58 am
by KOamps
Re: Let's see your finished DIY projects!
Posted: Tue Jul 30, 2013 5:42 am
by spruce_moose
Here's that fuzz!

Re: Let's see your finished DIY projects!
Posted: Tue Jul 30, 2013 11:43 am
by Jero
^That artwork is awesome! Not too keen on the knobs though.
Re: Let's see your finished DIY projects!
Posted: Tue Jul 30, 2013 11:52 am
by Dulouz


Another SHO build. This one's for a buddy of mine. The layout if from tagboardeffects.blogspot.com.
Re: Let's see your finished DIY projects!
Posted: Tue Jul 30, 2013 4:18 pm
by soldersqueeze
spruce_moose wrote:Here's that fuzz!
Most. Awesomest. Artwork. Evah.
Re: Let's see your finished DIY projects!
Posted: Tue Jul 30, 2013 4:21 pm
by soldersqueeze
Lovetone Big Cheese and modded DAM Sonic Titan clones.


This is my new number one bass distortion. It is just a huge wall of crushing doom. It gives me teh bonerz when I play chords.


