Page 3 of 6
Re: I am actually building an Explorer now!
Posted: Tue Mar 25, 2014 4:14 am
by FlyingVFanatic
Ahhh sweet, i had hoped it was something like that

Re: I am actually building an Explorer now!
Posted: Tue Apr 08, 2014 11:24 am
by FlyingVFanatic
Finally got something to update, Got clamps, looots of clamps, and measured up the neck. Surprisingly, the neck is only a tiny amount off the scale length when shunted right in, and is angled perfectly. However, the fretboard sits just a little too high above the body, so i gotta fix that
- neck too high.jpg (35.02 KiB) Viewed 3212 times
so ill probably take off some wood from the bottom, and then also sand the body at the neck join, so the two sit nicely in line with one another. Good thing i still have a decent amount of primer left :P
Re: I am actually building an Explorer now!
Posted: Tue Apr 08, 2014 10:54 pm
by Decibill
Why do you think the neck is sitting too high....? Did you do a "dry" mock up with the bridge in place and with strings on...?
Re: I am actually building an Explorer now!
Posted: Wed Apr 09, 2014 6:39 am
by FlyingVFanatic
hmmmm no i didnt, but the neck i feel is too high because the fretboard, when its in contact with the body, isnt flush at the bottom. If that makes sense... Basically im trying to have it sit the same way it does on a Gibson Explorer. If im going about this the wrong way id love to hear how i should
")
Re: I am actually building an Explorer now!
Posted: Wed Apr 09, 2014 11:09 pm
by Decibill
I wouldn't worry about how it "looks". The fretboard isn't always flush with the top of the body. If you set the neck into the pocket further than it is supposed to, you will mess up the action big time. I'd recommend putting the neck in place and get a wood clamp to hold it in place--don't glue it yet (assuming it's a set neck, not bolt on). Install the tuners, bridge and tail pice. Then install as many strings as you can--the clamp will prevent you from having all six strings on. Tune it up and get the intonation at least close. Now take a look at the action. How does it look and feel...?? Is the bridge sitting really high...?? This "dry" assembly should tell you a lot about what needs or doesn't need to be done....!!
Re: I am actually building an Explorer now!
Posted: Thu Apr 10, 2014 6:06 am
by FlyingVFanatic
Ahhhhhhh thank you! thats a brilliant idea. I shall do that at the soonest oppurtunity then
Re: I am actually building an Explorer now!
Posted: Mon Apr 14, 2014 2:29 pm
by FlyingVFanatic
Not a major update, no pictures, but having taken Decibills sound advice (haaaa) ive been sticking the hardware on, and daaaang even with just the tuners half on, it looks so gooood. Glad i got the grover mini-Rotomatics, they look so good.
Ill get pictures up for the dry assembly once i get in that Gotoh tunomatic i bought on impulse.

Re: I am actually building an Explorer now!
Posted: Mon Apr 14, 2014 11:06 pm
by Decibill
Sweet. It's always nice to see things start to come together. It is a good motivation boost...!
Re: I am actually building an Explorer now!
Posted: Tue Apr 15, 2014 8:46 am
by FlyingVFanatic
It is suchhh a good motivational boost... Especially lining up all the parts in a loose look at what itll look like at the end and seeing this
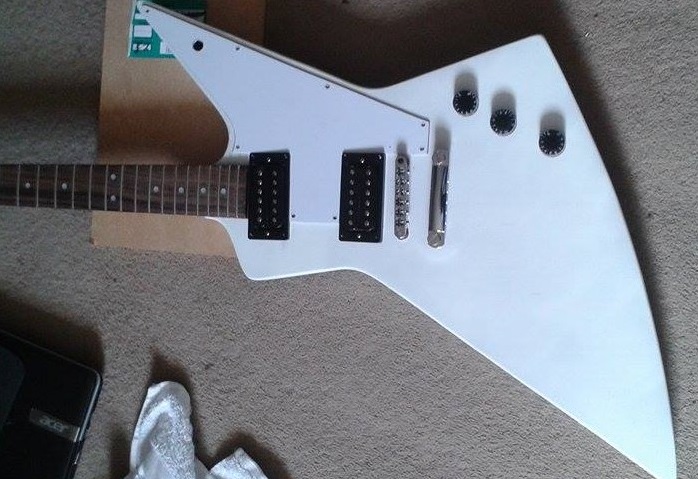
- explorer5 (2).jpg (123.5 KiB) Viewed 3305 times
looks so good ;-; gotta get that gotoh bridge asap and then make sure everything fits properly. im almost certain that the neck heel is a few millimeters too long, im pretty sure the scale length was over by a couple.... Having just measure there, its off by about 3 millimetres rigt now, but ill remeasure when i have the thing dry clamped and strung
Re: I am actually building an Explorer now!
Posted: Tue Apr 15, 2014 10:50 pm
by Decibill
Don't be thrown off if the scale length isn't spot on in terms of a precise measurement from the nut to the bridge. It also depends on which saddle you are measuring to. Usually measure using the B and A saddles The important thing is that it intonates properly when you do the dry mock up.
Re: I am actually building an Explorer now!
Posted: Wed Apr 16, 2014 8:27 am
by FlyingVFanatic
yeah, i am not gonna do anything to change the neck till ive done the dry fit. But thanks for that, i thought it had to be suuuper precise :P
Re: I am actually building an Explorer now!
Posted: Sun May 04, 2014 3:13 pm
by FlyingVFanatic
Finally got the replacement bridge (cause i totally didnt fuck up the stock one) and started the dry fit whooh! Everything is pretty decent, except the 9th Fret has popped out

any ideas on fixes?
And here is a picture of my somewhat half-arsed clamping. camera cant get a good picture of the popped fret
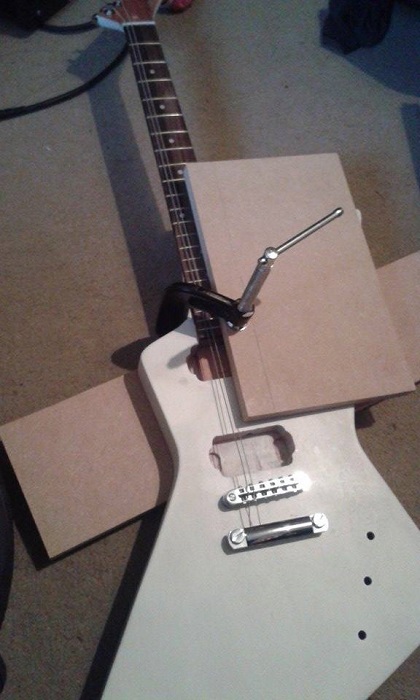
- 10313229_268661303313268_211900151484523185_n.jpg (86.2 KiB) Viewed 3219 times
Re: I am actually building an Explorer now!
Posted: Sun May 04, 2014 4:36 pm
by AxAxSxS
did it take any wood with it? You want to make sure that the curvature of the fret wire is the same or slightly more than the radius of the fretboard. I would CA glue the sides of the slot it sits in to build up wood there, being careful not to fill the channel, maybe use a razor blade or something to ensure the glue only gets on the side, not the bottom, and then tap it back into place once the ca has set. If you can rig up a press with some spare wood and a couple of clamps, that should work.
Re: I am actually building an Explorer now!
Posted: Sun May 04, 2014 6:36 pm
by FlyingVFanatic
hmm nah, i actually think that the fret was never put in properly at its birthplace. So the wood is completly intact, i just have a really buzzy fret. So just clamp it back down and glue?
What is CA glue by the way? :P
Re: I am actually building an Explorer now!
Posted: Sun May 04, 2014 6:44 pm
by AxAxSxS
Cyanoacrylate (super glue) I would not glue it in place in case you want to replace down the road. tension should do the job. which is why I was recomending to beef up the side walls a bit before pressing it back in place.